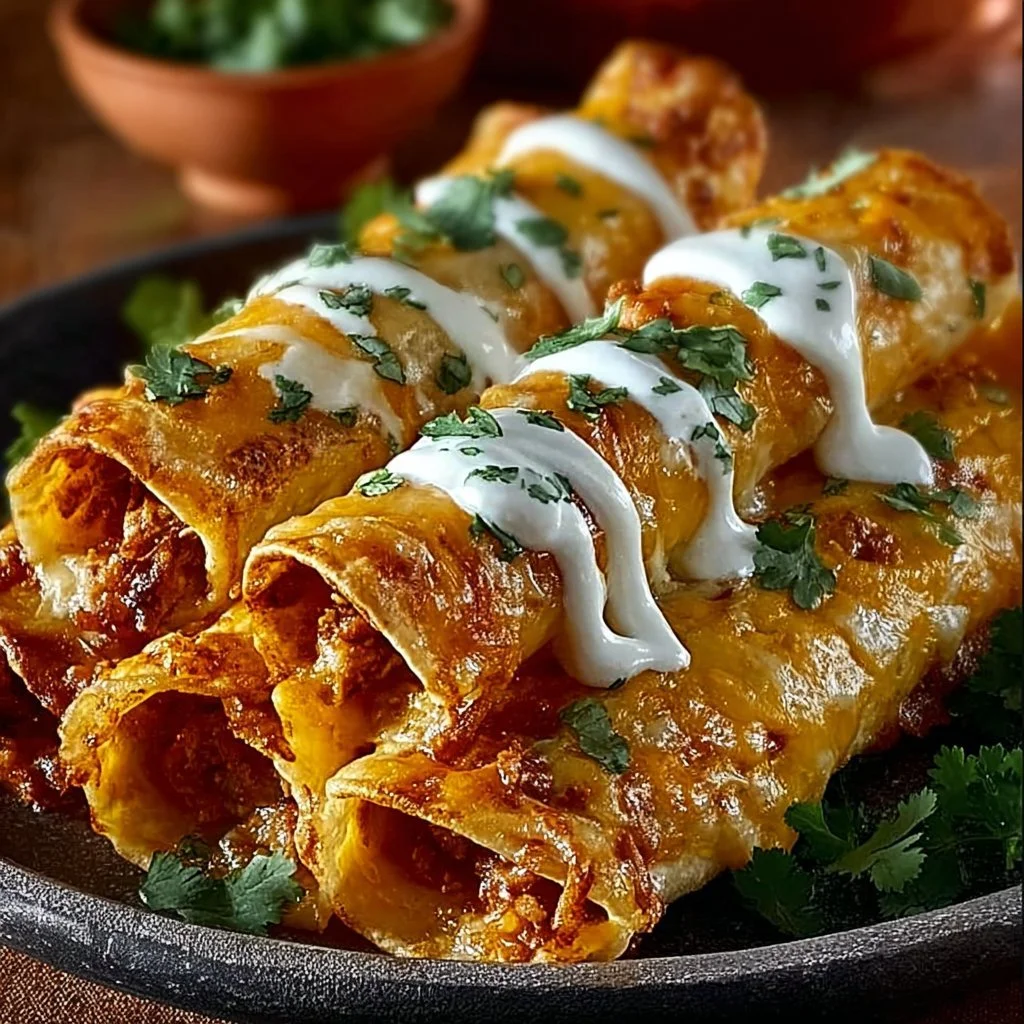
Cheesy Taco Sticks
Why Make This Recipe
Cheesy Taco Sticks are a great option for those who want to enjoy a delicious and satisfying meal without putting too much time or effort into cooking. Perfect for busy weeknights or a fun snack during a movie night, these tasty treats are sure to please both kids and adults alike.
One of the main reasons to make this recipe is its versatility. You can adjust the ingredients based on your dietary preferences or what you already have in the kitchen. Want to cut down on calories? Use ground turkey instead of beef. Need it gluten-free? Choose a gluten-free pizza dough. The use of taco seasoning adds a flavorful kick, making every bite feel festive and exciting.
Not only are they delicious, but Cheesy Taco Sticks are also convenient. They can be served as a main dish, an appetizer, or even a party snack. Plus, with the cheese melting into the taco meat, every bite is packed with flavor. You can serve them plain or pair them with your favorite dipping sauces.
With this simple recipe, you can impress your family and friends without spending hours in the kitchen. Let’s dive into the steps to create this quick and delicious dish.
How to Make Cheesy Taco Sticks
Making Cheesy Taco Sticks is straightforward and does not require advanced cooking skills, making it accessible for everyone. The process involves cooking the meat, preparing the dough, and assembling the sticks. Before you know it, you’ll have a plateful of these delightful bites ready to eat.
Ingredients:
- 1 pound Ground Beef (or ground turkey for a leaner option)
- 1 packet Taco Seasoning (homemade for controlled sodium)
- 2 tablespoons Water (optional if beef is well-drained)
- 1 package Refrigerator Pizza Dough (gluten-free option available)
- 8 sticks Colby-Jack Cheese Sticks (or cheddar/dairy-free cheese)
- 2 tablespoons Butter (or olive oil for a lighter option)
- 1 teaspoon Garlic Salt (fresh garlic can be substituted or omitted)
Directions:
-
Preheat the oven: Begin by preheating your oven to 400°F (200°C). This ensures that the Cheesy Taco Sticks bake evenly and come out perfectly golden.
-
Cook the meat: In a large skillet over medium heat, add your ground beef or turkey. Cook until it’s fully browned, breaking apart any large chunks as it cooks. This step is essential to get a good texture in your filling. Don’t forget to drain any excess fat after cooking.
-
Add seasoning: After cooking, sprinkle the taco seasoning over the browned meat. If you decide to use water, add it now to combine the seasoning better. Cook this mixture for another 2-3 minutes, then remove it from heat. This will infuse the meat with all the great taco flavor.
-
Prepare the dough: On a lightly floured surface, take out the refrigerator pizza dough and unroll it. Roll the dough into a rectangle about ¼ inch thick. Using a sharp knife or pizza cutter, slice the dough into strips about 1 inch wide. This will be the base for your taco sticks.
-
Assemble the sticks: Place 2 tablespoons of the taco meat mixture onto each dough strip. Then, take a cheese stick and place it on top of the meat. Make sure you center it to avoid any spills during the rolling process.
-
Roll them up: Carefully roll up each strip of dough over the meat and cheese. Ensure you seal the edges well by pinching them together to keep the filling from spilling out during baking. Place the rolled sticks seam-side down on your prepared baking sheet.
-
Add flavor: In a small saucepan or microwave, melt the butter or heat the olive oil. Once melted, stir in the garlic salt. Brush this mixture over the tops of the taco sticks. This step adds flavor and promotes browning.
-
Bake in the oven: Place your baking sheet in the preheated oven. Bake for 15-20 minutes or until the taco sticks are golden brown and the cheese is melted. Keep an eye on them as baking times can vary depending on the oven.
-
Cool and serve: Once baked, remove the Cheesy Taco Sticks from the oven. Let them cool for a couple of minutes before serving. This allows the cheese to set a little, making them easier to eat and less likely to spill when you take a bite.
How to Serve Cheesy Taco Sticks
Cheesy Taco Sticks can be enjoyed in numerous ways, enhancing your dining experience. They are perfect for:
- Party appetizers: Serve them on a platter at gatherings. People will love grabbing and munching on these bites.
- Quick lunches: Pair the taco sticks with a salad or some fresh vegetables for a fulfilling lunch option.
- Snacks: Great for those moments when you want something cheesy and savory to nibble on. These can be a fantastic addition to your game-day spread.
Feeling a bit fancy? Consider serving them with sides like guacamole, salsa, or sour cream for dipping. You can also add a dollop of pico de gallo or a sprinkle of chopped fresh cilantro on top just before serving for an added pop of color and flavor.
How to Store Cheesy Taco Sticks
Storing your leftover Cheesy Taco Sticks is simple. Once they have completely cooled, you can keep them in an airtight container. Here are some tips for storage:
- Refrigeration: They can be stored in the refrigerator for about 3-4 days. Just make sure the container is sealed well to maintain freshness.
- Freezing: If you have more than you can eat, you can freeze them. Wrap each taco stick individually in plastic wrap, then place them in a freezer-safe container or bag. They can be frozen for up to 3 months. When ready to eat, simply reheat in the oven or microwave until hot.
When reheating, preheat your oven to 350°F (175°C) and bake for about 10-15 minutes until they are warmed through and crispy again. Alternatively, microwave for about 30-60 seconds, but be aware that the texture may not be as crispy.
Tips to Make Cheesy Taco Sticks
To ensure your Cheesy Taco Sticks turn out perfectly every time, here are some helpful tips:
-
Don’t overfill: While it may be tempting to pack the filling in, overfilling can cause the sticks to burst during baking. Stick to the recommended amounts.
-
Seal well: Make sure the edges are well-sealed after rolling. This holds all the delicious filling inside and keeps your sticks from falling apart.
-
Experiment with flavors: Feel free to mix in additional spices or ingredients into the meat mixture. Chopped bell peppers, onions, or even jalapeños can enhance the flavor and texture.
-
Use a variety of cheeses: While Colby-Jack is great, try other types of cheese depending on your preference. Pepper Jack can give it a nice spicy kick, or use a dairy-free cheese if you have dietary restrictions.
-
Make it a family affair: Get your kids or friends involved in the assembly process. It’s a fun way to bond and they will enjoy participating in the kitchen.
Variation
Want to mix things up? There are numerous variations you can try with Cheesy Taco Sticks:
-
Vegetarian: Substitute the meat with a mixture of black beans, corn, and bell peppers. Add some taco seasoning for flavor.
-
Breakfast version: Replace ground beef with scrambled eggs and add some cooked sausage or bacon. Use breakfast cheese for a delightful morning twist.
-
Sweet twist: For dessert bites, try using Nutella or cream cheese with chocolate chips wrapped in the dough instead of taco filling!
No matter how you decide to vary this recipe, the cheese and dough combination will always yield a fantastic taste and texture.
FAQs
1. Can I make Cheesy Taco Sticks in advance?
Yes! You can assemble the sticks ahead of time and refrigerate them. When you’re ready to cook them, just place them in the oven, adding a few extra minutes to the baking time if they are cold from the fridge.
2. Can I use other seasonings besides taco seasoning?
Absolutely! You can try other seasoning blends like fajita seasoning or chili pack for a different flavor profile. Adjust as per your taste preference.
3. What can I serve with Cheesy Taco Sticks?
These pairs beautifully with salsa, guacamole, and sour cream. You can also serve them with a side salad or chips for a complete meal.
4. How do I keep the sticks from getting soggy?
Make sure to drain any excess grease from the meat and avoid adding too much liquid during cooking. Also, let them cool briefly before serving, which helps maintain their crispiness.
5. Are there any sides that go well with Cheesy Taco Sticks?
Some great side choices include a fresh salad, corn on the cob, or even a side of nachos. It all depends on your desired meal experience!
Cheesy Taco Sticks are a culinary delight that brings comfort and joy with each bite. They are extremely simple to make, adaptable to different dietary needs, and perfect for any occasion. Whether you’re hosting a party, seeking a snack, or preparing dinner, these sticks are a fantastic option that doesn’t compromise on taste or fun. Enjoy the deliciousness!